Out of all the best website builders for small businesses, Wix has captured the lion’s share of attention lately (not to mention the market’s share). But even if you like its design style and pricing, that doesn’t mean you know how to make a Wix website.
Second only to Squarespace, Wix features a user-friendly, WYSIWYG site editor at affordable prices, with a healthy library of templates to get you started. Even if you have no experience whatsoever with web design, Wix lets you design and customize sites with ease—or simply fill-in-the-blanks on a standard template if you still want to avoid design.
But how does it work? In this guide, we explain how to create a Wix website, from setting it up to designing your web pages. We even talk about how to unpublish a Wix website if you’re having trouble removing it from online. But before you do any of that you need to sign up, so let’s start at the beginning.
How to set up a Wix account
—
First things first, let’s walk through not only how to sign up at Wix, but also the Wix pricing plans, so you know which one is best for you.
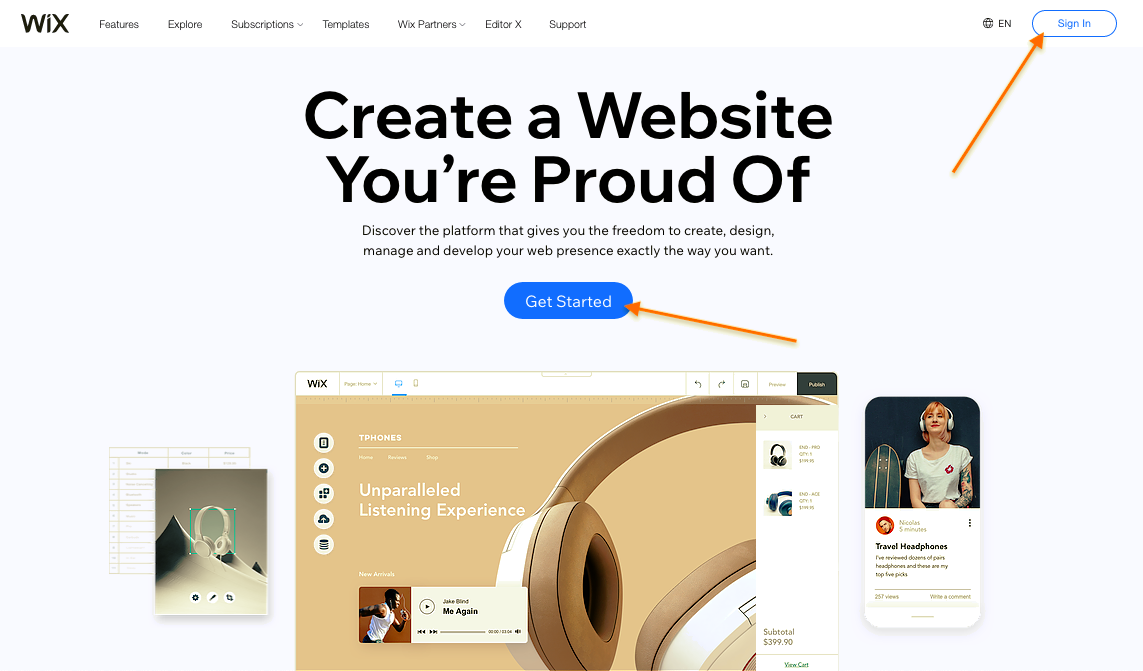
1. First things first, go to the Wix main page.
2. To get started, click on the big blue button that says Get Started. You can also click on the Sign In button in the upper-right corner—both links go to the same page.
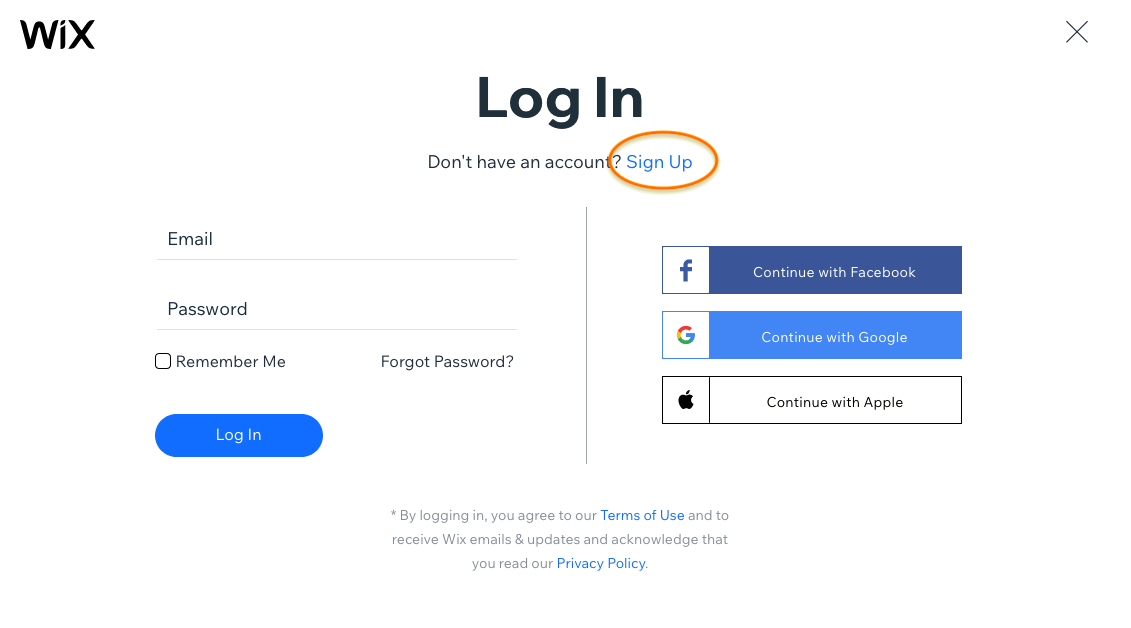
3. Now you’re on the log in page, but you need to create an account first. Click Sign Up near the title.
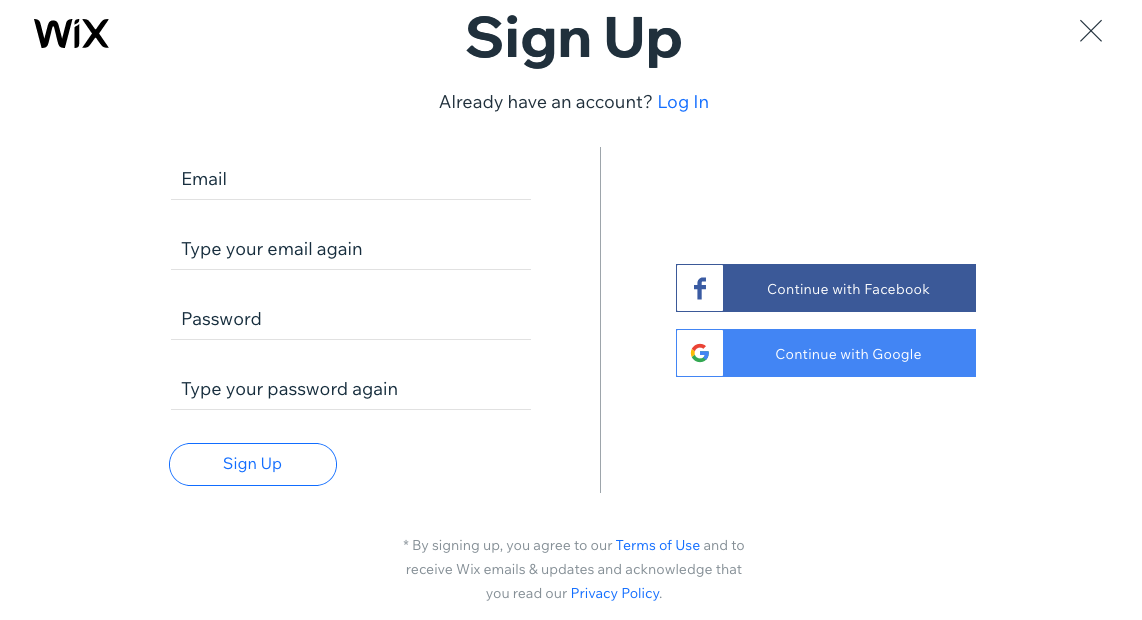
4. Finally, you’ve reached the sign up page. This is pretty straightforward: just enter the email you’d like to use with your account, or sign up with your Facebook or Google account.
5. From here, you’re taken to an onboarding questionnaire to help personalize Wix for you. Although it’s skippable, filling in the multiple-choice questions affects what templates are recommended or how automated sites are built.
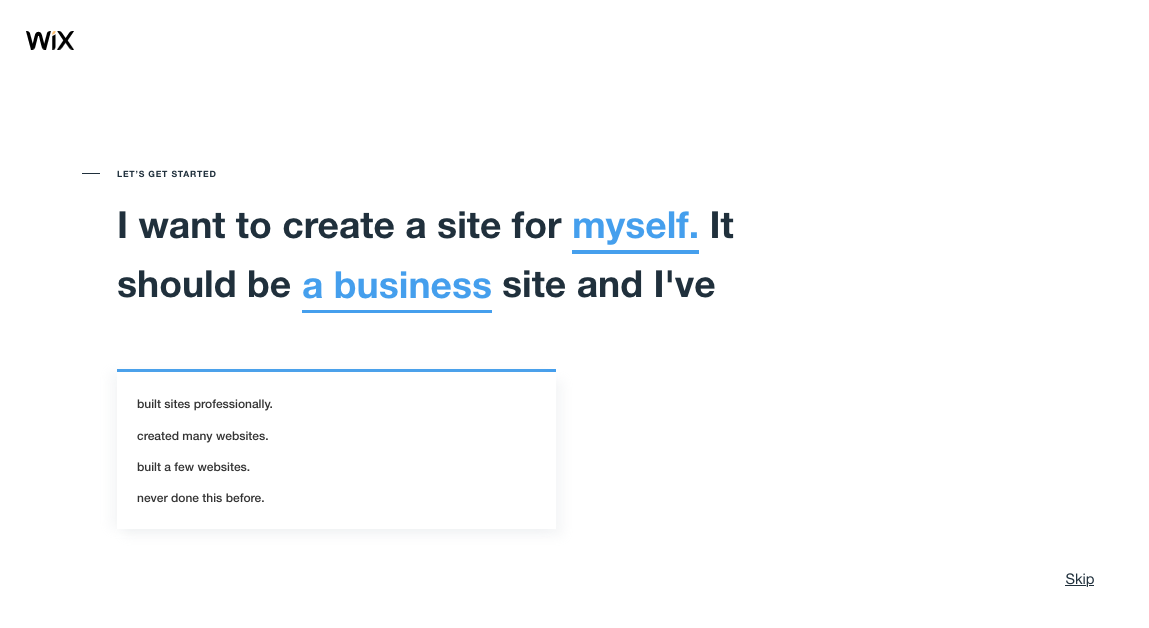
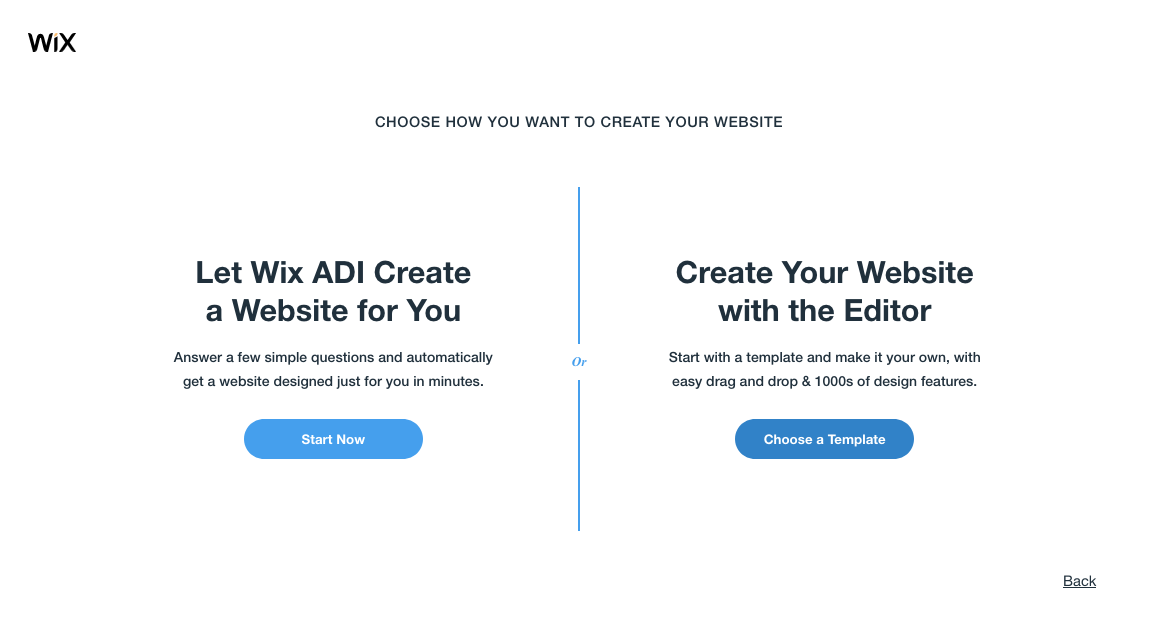
6. Ultimately, you have two choices: build the site yourself off a template or let the ADI (artificial Design Intelligence) auto-generate it. Building it yourself takes longer, but lets you customize more, whereas using the ADI gives you a ready-made site in no time, but without customization.
Of course you can also customize your ADI site later, but if you want to get your hands dirty anyway, you might as well start out designing off a template you’ve chosen. For this guide, we take the Create Your Website with the Editor approach.
How to create a Wix site using a template
—
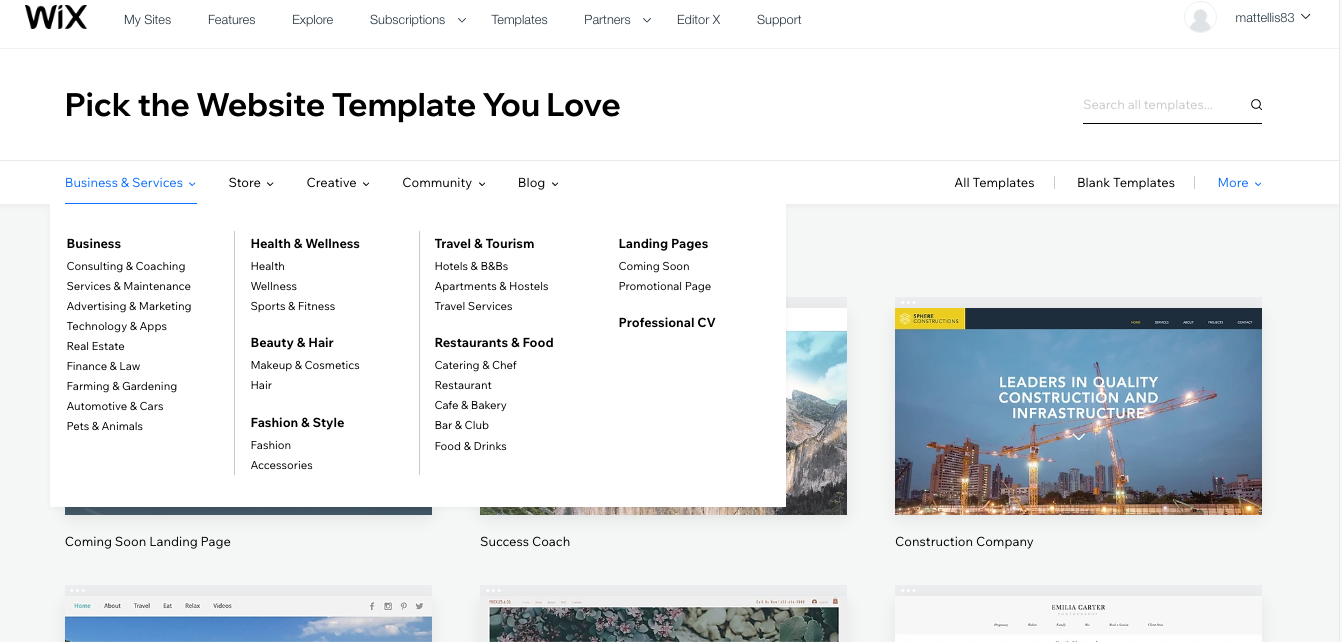
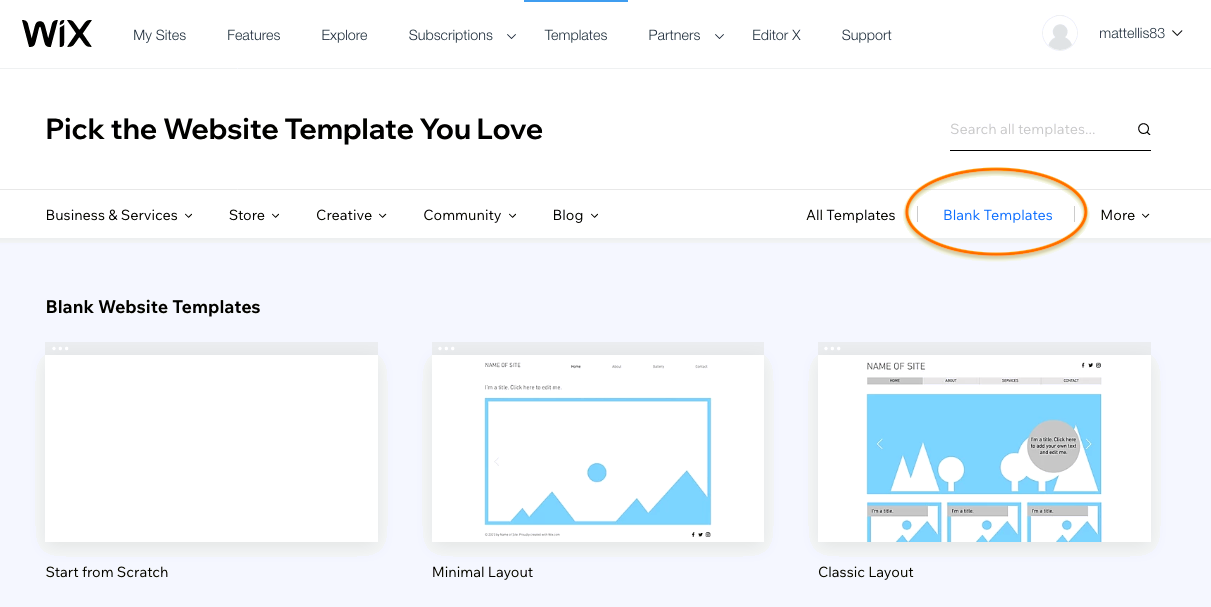
1. You need to access the Wix template page, either by following the instructions above or clicking here.
Choosing your template is one of your most important design decisions. Pay attention to how the templates organize your site, in particular navigation and user interface. You can always change your images or color scheme, but changing the structure of your page is more daunting.
Thankfully, Wix makes browsing templates easy with their categories. At the top of the page, you can see templates organized by industry (Business & Services), the types of goods you sell (Store), themes for creative or business portfolios (Creative), themes for other organizations like events or non-profits (Community) or styles for a blogging website (Blog).
2. Browse through a bunch of templates until you find one you connect with. Keep in mind the specific visuals can often be changed (if you put in the effort), so focus more on structure and usability. You can view a sample of the template by hovering over a selection and clicking View, or you can jump straight into editing by clicking Edit.
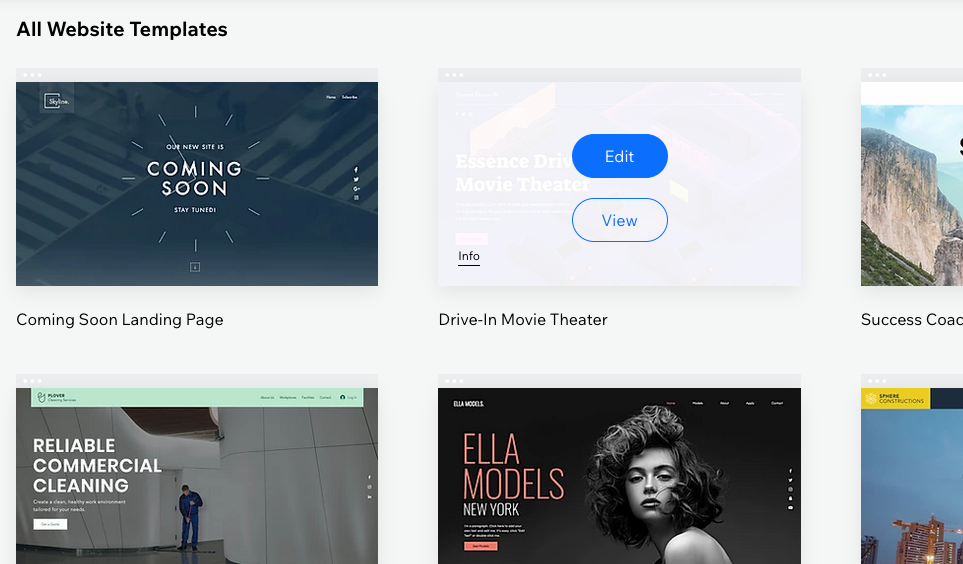
3. You can also design a website on a blank canvas. Just click Blank Templates in the upper-right, under the search bar. These “maximum minimalist” templates let you virtually build your site from scratch if you don’t like any of the detailed templates.
How to choose Wix payment options
—
Wix offers a fairly generous free site builder, including hosting, so you may not need to pay Wix at all. However, consider some of the main drawbacks of a Wix free account:
- Forced ads on your site
- Cannot change your template once your site is published
- Generic URL
If you’re serious about your website, it’s worth it to invest in a Premium plan for more features and freedom. And if you’re planning on upgrading, it’s best to do it before you start designing so you don’t have to redo anything.
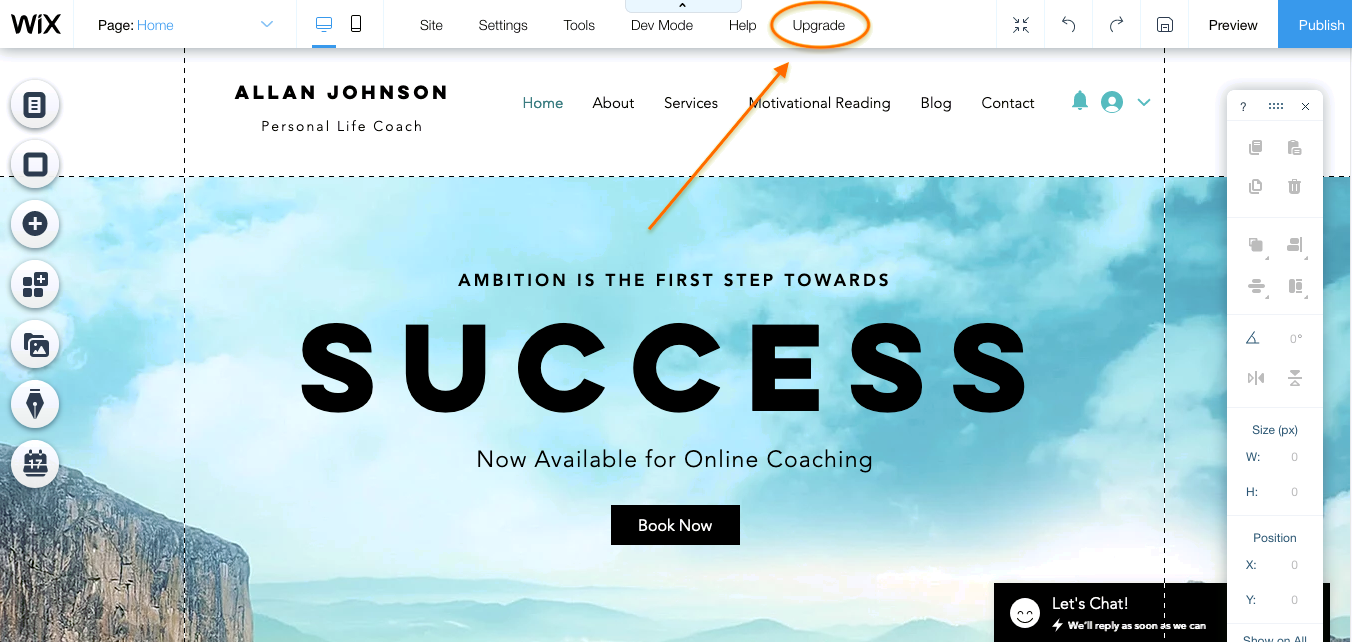
1. If you want to start a Premium account, just click Upgrade at the top of the screen from the site editor. You will be prompted to save if you haven’t already, and have the opportunity to register your custom domain.
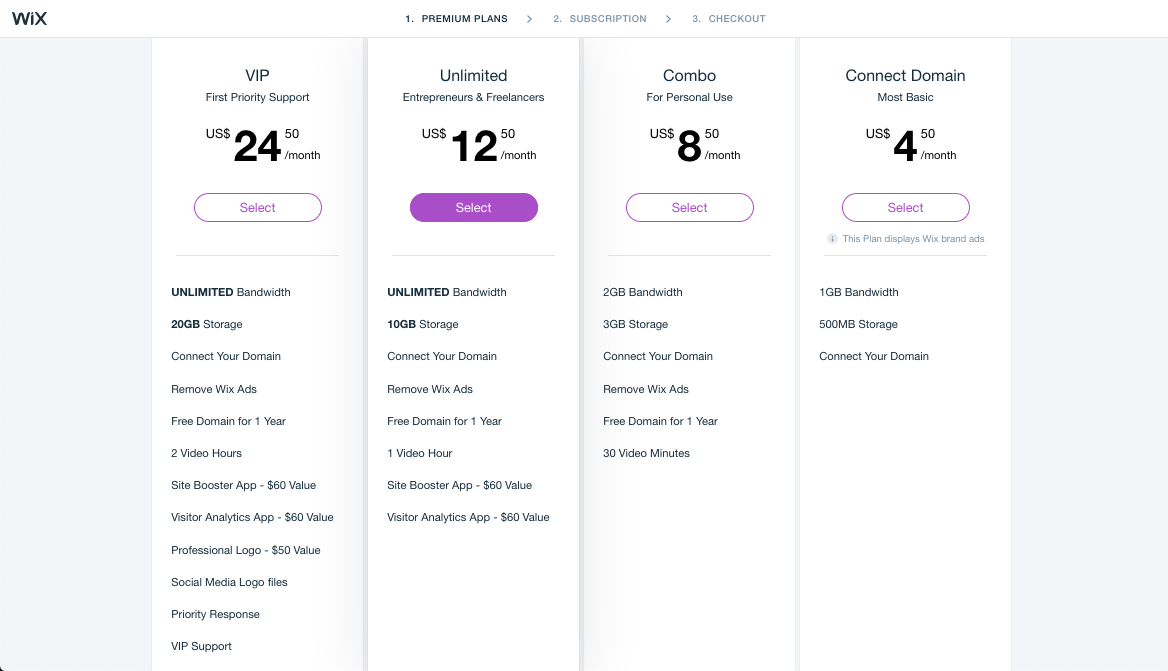
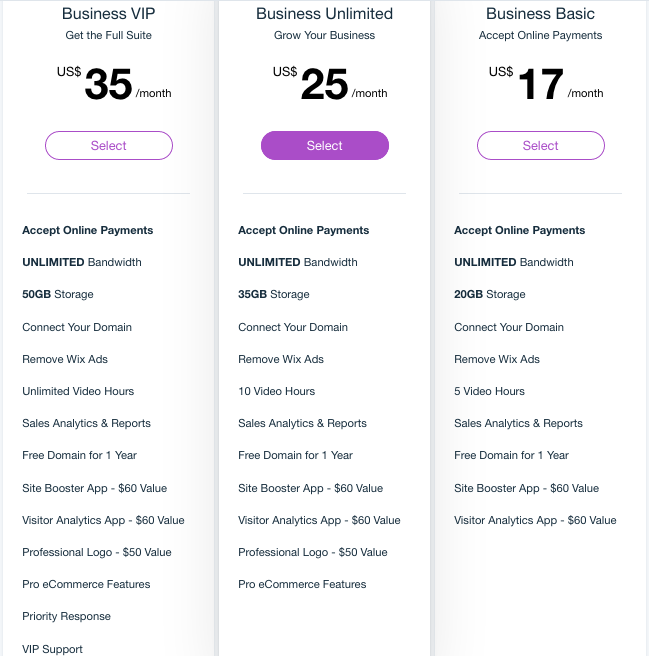
2. Wix offers 4 premium plans for standard websites and 3 premium plans for ecommerce sites. Compare the features and benefits below to see which is the best for you, and then click Select on the plan you’d like.
Standard:
Ecommerce:
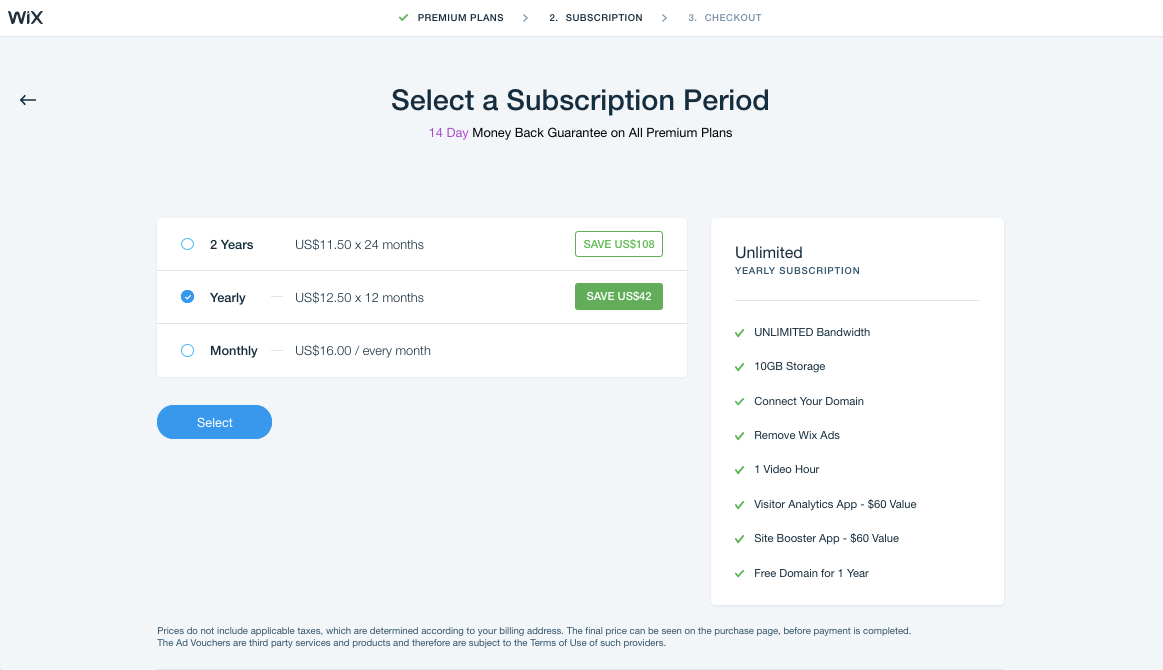
3. Next you choose your subscription type, or how long you’d like to subscribe for. Like most sites, Wix offers price breaks the longer you sign up, but you have to pay the whole subscription at present.
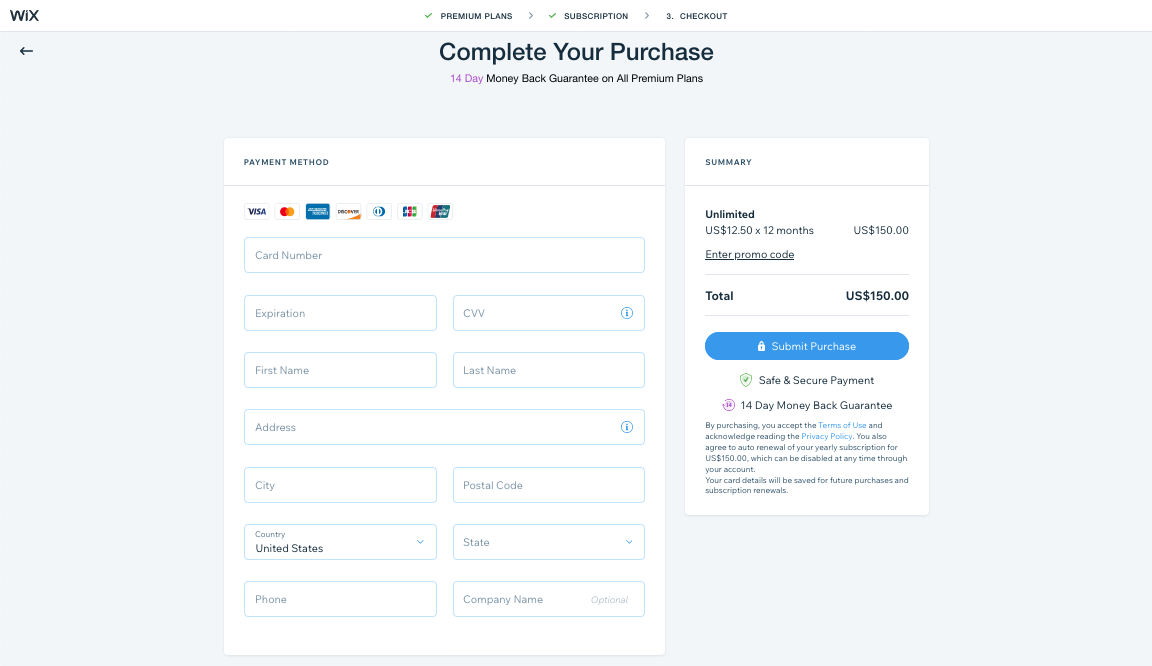
4. Last is the checkout, where you enter your payment details. Wix accepts all major credit cards and a few international banks. When you’ve finished, click Submit Purchase and wait for confirmation.
5. Once your account has been upgraded, you’ll have all the available features in your plan ready to go. That means it’s time to roll up your sleeves and start designing. You’re also free to publish your site at any time, but we recommend sprucing it up first.
How to create and design a Wix website
—
After choosing your template, you’re free to explore the site editor and make any customizations you want. Although the interface is fairly user-friendly, it can be a bit overwhelming at first, so here we’ll explain some of the basic controls.
Functionality
Essentially, you click on the area you want to edit, and that brings up the control menu. Want to change the navigation menu? Click on it. Want to change the background image? Click on it. Want to rewrite text? Click on it. The only problem is that some elements overlap, so you might have to click a few times before hitting the one you want.
If you double-click on an element, that brings up a specialized editing window with even more commands—which commands again depends on the type of element.
Different elements have different controls, but you’ll notice sometimes the same icons are used (for example, animation). We’ll explain what those controls are below.
Top Navigation

The top navigation menu (of the Wix editor, not the site you’re editing), has all of the actions not directly related to editing. Here’s a brief explanation of what each item does, from left to right.
- Page:_____ — go to a different page or manage all your pages
- Desktop and Mobile icons — choose between desktop view and mobile view (for more responsive mobile sites)
- Site — actions for the entire site, such as saving, duplicating or trashing.
- Setting — this is an important area where you adjust the behind-the-scenes settings of your site, including analytics, social sharing, SEO options and your favicon. When you have some free time, it’s worth it to explore and personalize these.
- Tools — affects the display for the editor, what you see and don’t see.
- Dev Mode — although it’s just in preview at the moment, this mode offers more technical options, like customizing code or connecting to external APIs.
- Help — your basic help section.
On the far right:
- Four arrows icon — zooms out for a more bird’s eye view of your site
- Curved arrow to the left — undo the previous action
- Curved arrow to the right — redo an action you just un-did.
- Save icon — saves your site manually
- Preview — enter Preview mode, where you can browse your site as if it were live (but not edit it)
- Publish — publish your site to make it live online.
Left Menu
For all your editing options, the column menu on the left of the screen has your main control. Keep in mind that you can sometimes access the same pages in multiple different ways, so don’t be confused if you see the same listing twice.

From top to bottom:
- Menus & Pages — this is the central command for managing your site overall, such as adding or renaming pages, or which pages appear on your site’s navigation menu.
- Background — change your background image, whether photo, video or matte color, and preview stock designs.
- Add — one of the most important tools, this is where you add new elements. Some people will be satisfied by revising the text and images that are present in the template, but if you want to go the extra mile with your site, you can add elements like buttons, contact forms, lightboxes and many more.
- Add Apps — this button simply takes you to the Wix app store, where you can add or buy specialized add-ons for extra features.
- Media — here you can upload original images, browse Wix’s stock library of images or use a photo editor to spruce up either.
- My Blog — this is the central command for your blog (if you have one), where you can add or edit posts, as well as play manage the structure of your blog.
- Bookings — take advantage of Wix’s booking widget, which lets users set up appointments through your site.
Once you publish, you’ll also have an option here to set up email marketing, though that’s completely optional.
Floating menu

You also have a free-floating menu that defaults on the right side. This menu has your standard editing icons, most of which should be familiar to you, such as copying, deleting and alignment.
In particular, this menu is helpful for fine-tuning your placement, with the option to specify precise coordinates for elements (in pixels). There’s also options for tilting or flipping images, as well as determining which layers go on top of others.
Because these commands are more optional, you can get rid of this window completely for a better view of your site.
Element menu
As we mentioned above, clicking on an element like text or a button brings up an editing menu for that element and double-clicking brings up a new window. Different elements have different commands, for example, double-clicking on text brings up a standard text editor, whereas double-clicking on the background image brings up the background image editor.
The commands are pretty straight-forward, so we suggest exploring freely. If you’d like to change a certain aspect of an element, browse the window that comes up and you should find the option you’re looking for.
Before we move on, there are some commands worth pointing out, though.
- Scroll Effects [icon looks like a box falling] — these control animations when users scroll down, such as parallax or zooming in effects. These can add some flair to otherwise bland sites, but be careful of loading times and lagging.
- Animation [icon looks like a box moving right] — for smaller elements like text block or separate images, you can add animated effects for how they first appear: bouncing, fading, spinning, etc.
- Layouts [icon looks like a screen broken into boxes] — these let you control how many columns are in a section, and what alignment they use, in case you want to change up your page structure.
- Stretch [icon looks like a line with arrows on both ends] — this is for fitting all your elements in a screen; you can play with margin sizes until you get it how you want.
- Page Design [paint brush icon] — If your background is a matte color, you can customize it here.
- Help [question mark icon] — a shortcut to the Help window.
Wix has a lot of options and aims to be as user-friendly as possible. That means if you don’t know how to do something, chances are you can figure it out by just a little exploration. You can always use the Help menu as well.
How to unpublish a Wix site
—
Last, one of the most popular concerns is how to unpublish a Wix site. The platform makes it obvious how to launch one, but not quite so obvious to delete it. But once you know how to unpublish a Wix site, it’s actually quite easy:
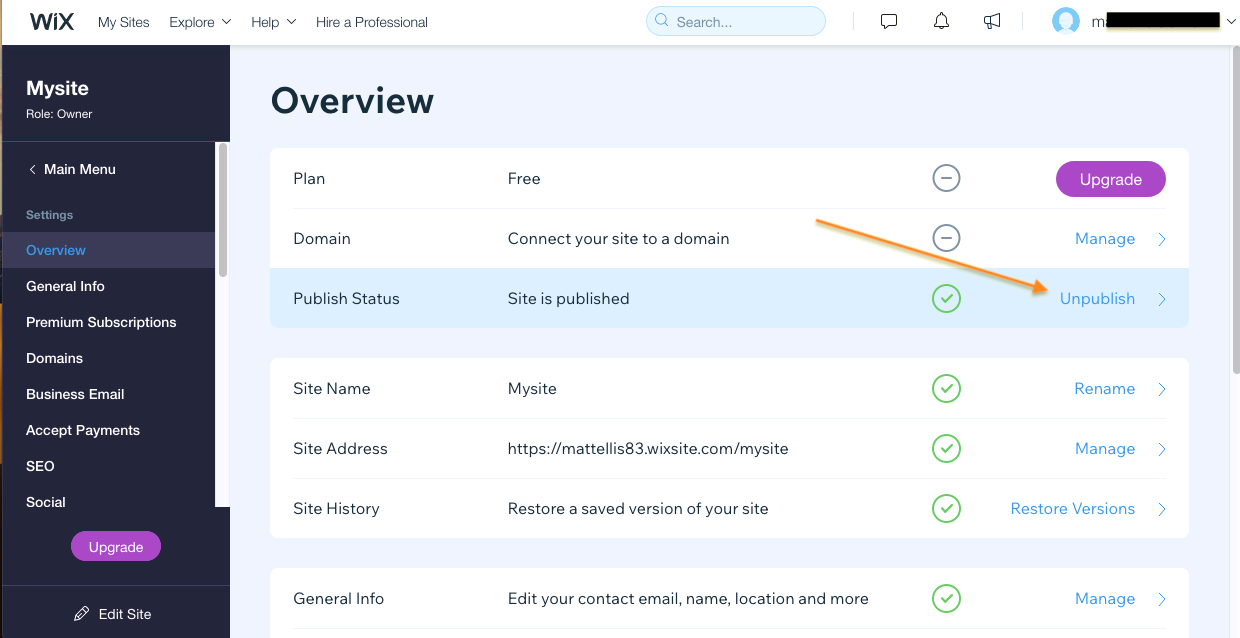
1. Go to your account Dashboard.
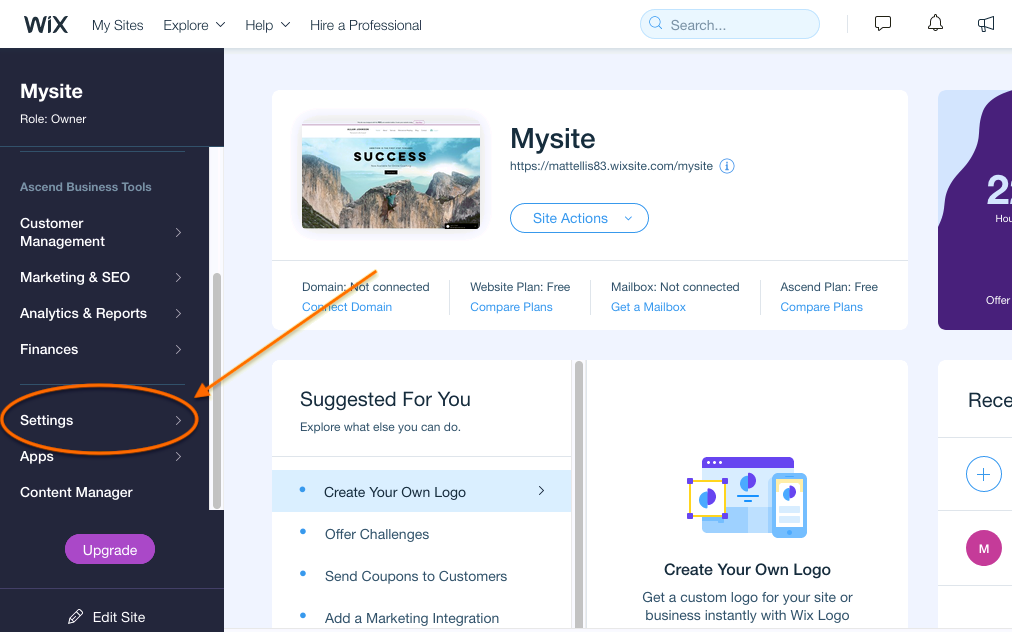
2. In the left column menu, scroll down and click on Settings (near the bottom). Double-check the upper-left corner to make sure you’re in the site you want to unpublish.
3. You’re taken to the Overview tab within Settings, which is exactly where we want to be. You’ll notice that the third option is Publish Status. Click on Unpublish to the right.
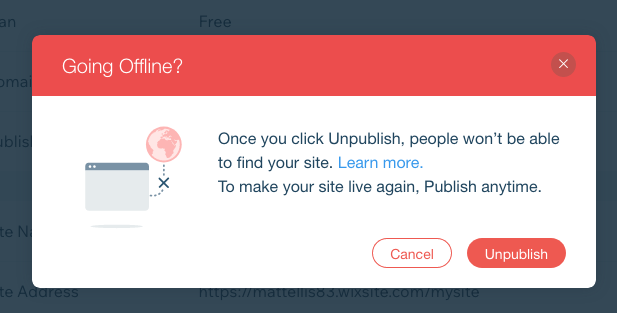
4. This brings up a confirmation screen. Simply click Unpublish and your Wix site will be taken offline.
Easy to use, but not easy to design
—
Wix is set up to make it simple to use, but that doesn’t necessarily make the designing aspect any easier. Creating a successful website requires an understanding of web design principles, which in turn require an understanding of graphic design principles. While you may be able to make a fully-functional site without web design experience, if you want to truly maximize your site’s potential, you should enlist the help of a professional.
99designs web design services help you pair with the professional designer that best matches your style and business goals. You can browse our top web designers yourself to find someone who catches your eye, or you can commission a design contest, where multiple designers send you design concepts and you simply choose the one you like best.
Want to get the perfect website for your business?
Work with our talented designers to make it happen.
The post How to make a Wix website—a step-by-step guide appeared first on 99designs.
No comments:
Post a Comment