Maybe you’ve heard the buzz about how easy it is to make a Squarespace website, or maybe you’ve been charmed by one of their A-list brand ambassadors. No matter how you got interested in Squarespace, you’re probably here for one reason: you have a website idea and want to “make it real.”

As an alternative to Wix or other website builders, Squarespace is a great platform for creating a website, even if you have no previous experience. The WYSIWYG interface makes building a webpage as easy as dragging and dropping, while the preset templates give you the structure and setup of a professionally made site.
Still, there’s a bit of a learning curve, and the user-friendly interface has a limit to its friendliness. So if you want to know how to make a Squarespace website, we have created this practical, step-by-step guide that answers the most common questions, with screenshots to avoid further confusion.
How to make a Squarespace account
—
Before you do anything, you need to set up a Squarespace account. You will need a Squarespace login every time you want to edit your site.
1. Go to the Squarespace main website.
2. Although there are a few different paths to get to the Account Creation page, the fastest is to click on Log In in the upper-right corner of the main page.

3. Click Create Account in the upper-right corner.
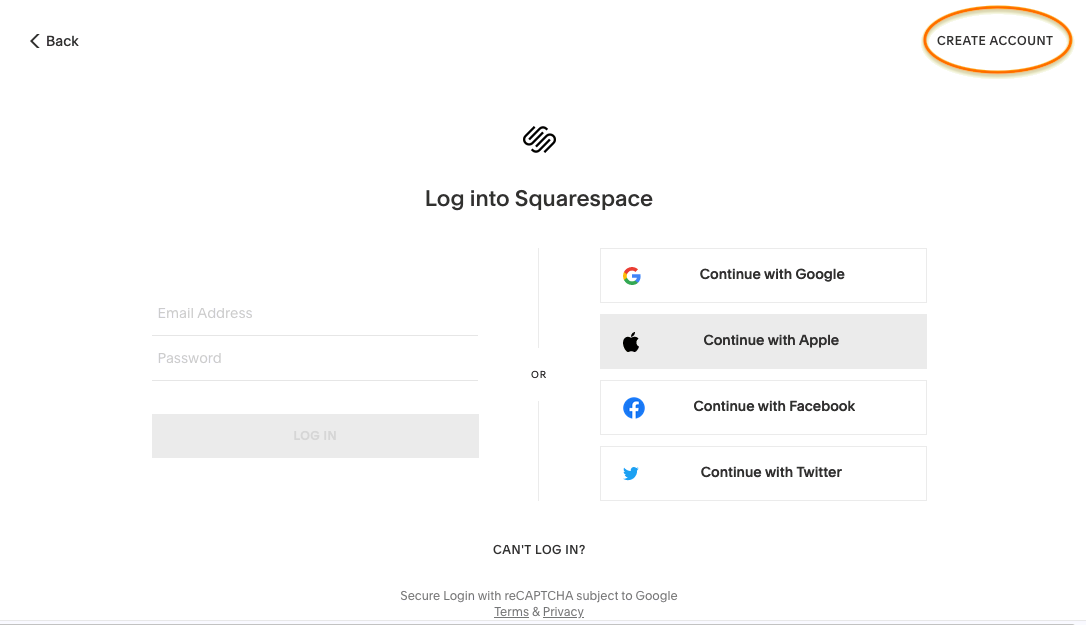
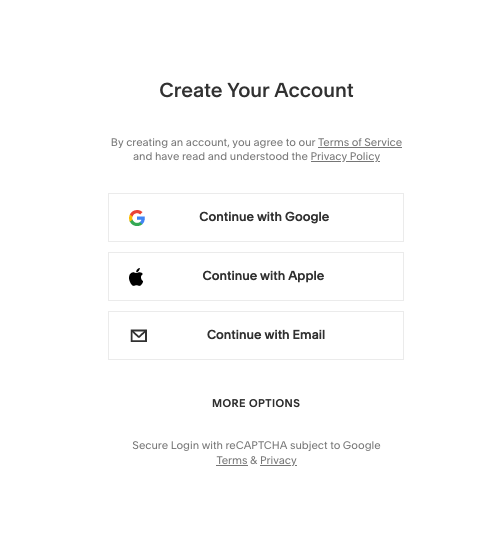
4. You have your choice of ID: Google, Apple or general email, plus Twitter or Facebook in Other Options. This will be your account ID, although you’ll get to personalize your password.
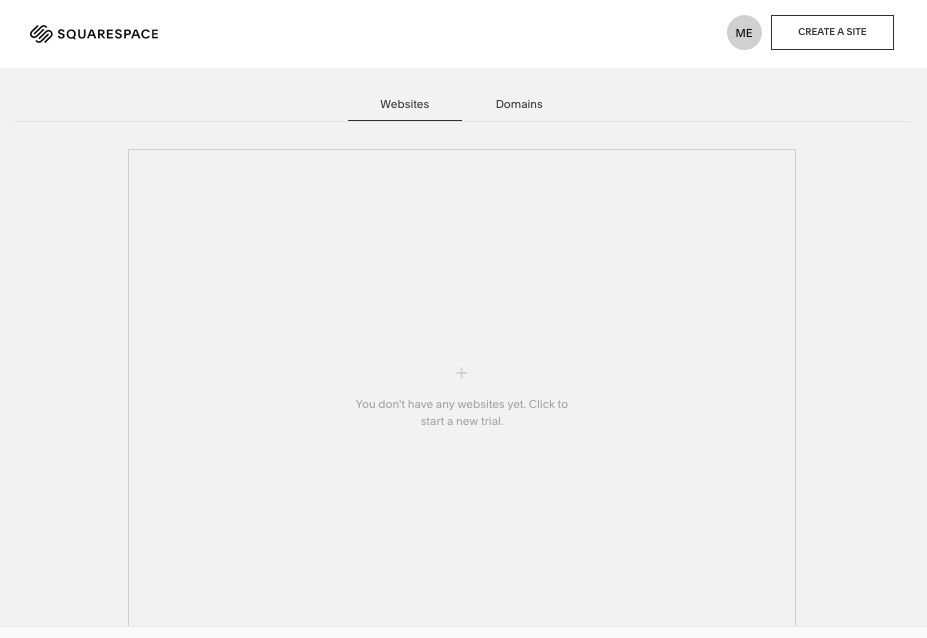
5. That’s it for now. From here you’re taken directly to the site editor, although your account has already been created. You can log back in any time to continue where you left off. You don’t have to worry about payment or credit card information just yet.
How to make a Squarespace website
—
Once you have your account, you can start creating your Squarespace website anytime.
1. After logging in, you’ll go to Your Account Page. Click anywhere in the big empty box, or click Create a Site in the upper-right corner. They both go to the same place.
2. Now you’re in the Squarespace Templates page. Choosing your template is the single most important decision you’ll make when building your Squarespace website. (Unless you’d rather get your own unique design, in which case you can work with a designer to create a custom Squarespace web design just for you—yes, that’s an option too! More on that at the end of the article.)
Since choosing a great template is so important, we recommend previewing a short-list of prospective templates before settling on a final choice. You can see the most popular templates by industry along the left vertical menu.
To preview templates, just click Preview by the template you’re interested in.
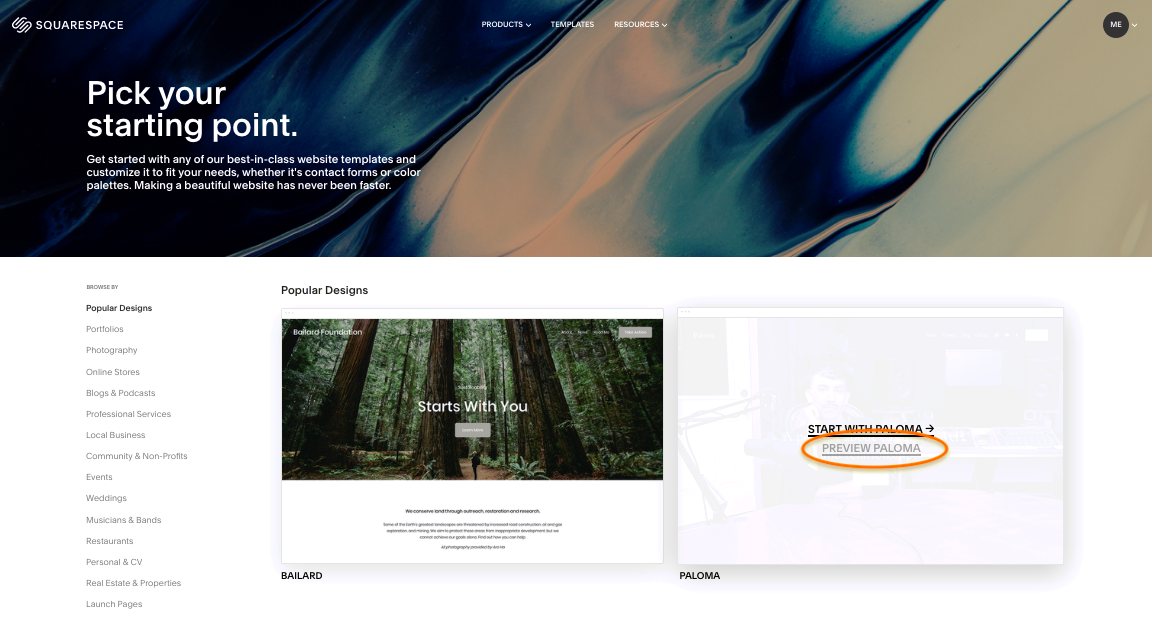
3. The preview shows you sample screenshots in different modes like desktop, mobile or tablet, which you can switch by clicking the icons in the top-left corner. To browse an interactive sample of what the template looks like when it’s published, click View Demo Site in the upper-right corner.

4. When you’ve found the template you want, click Start with this Design if you’re in the preview, or Start with … if you’re in the template page.
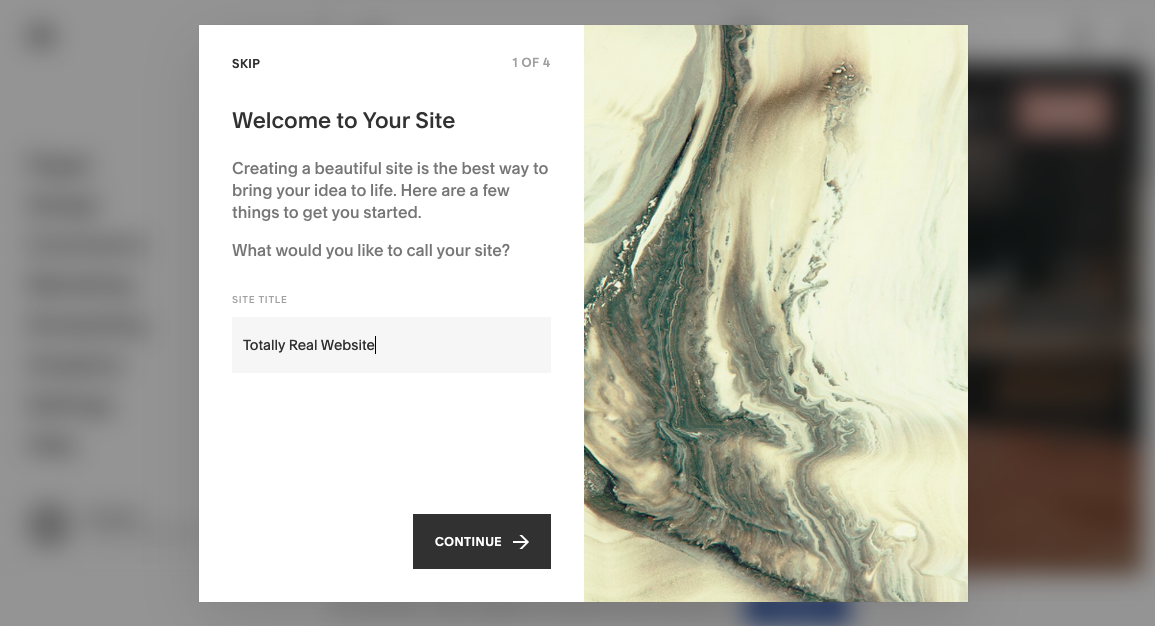
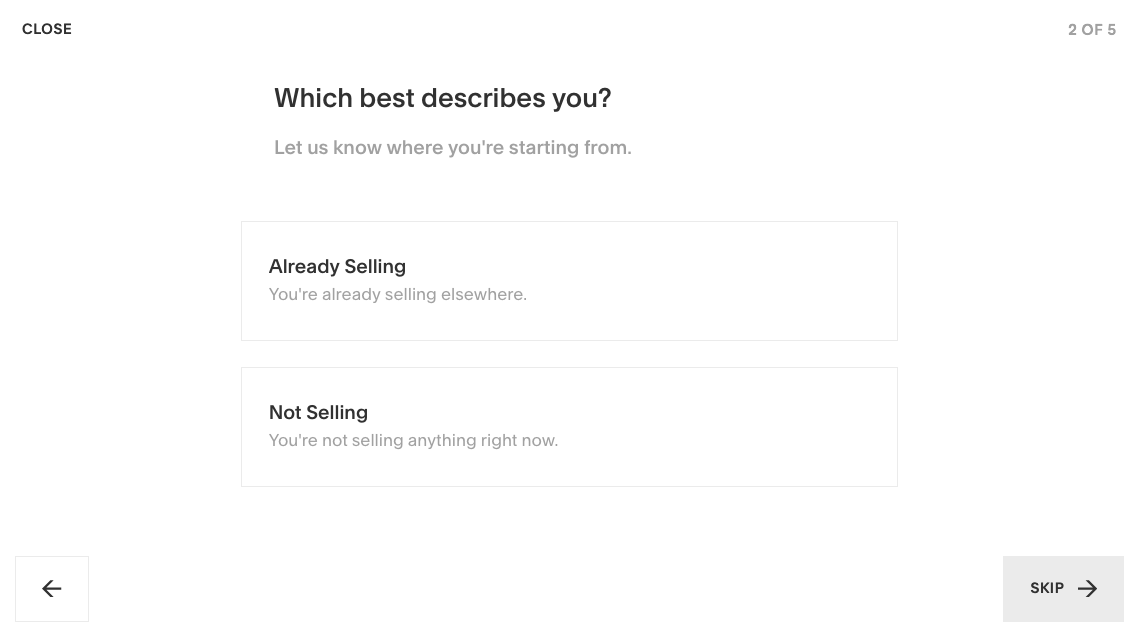
5. Now you’re taken to the onboarding assistant. Here you enter the title of your Squarespace website and read a quick tutorial on how to edit pages and design your site, or you can opt-out by clicking Skip.
6. Now here’s where the “fun” starts. In the site editor, you’re free to design your site however you want. The editor takes some getting used to, so we recommend playing around and clicking on items you’re curious about—although we explain how to do some of the more common tasks below.
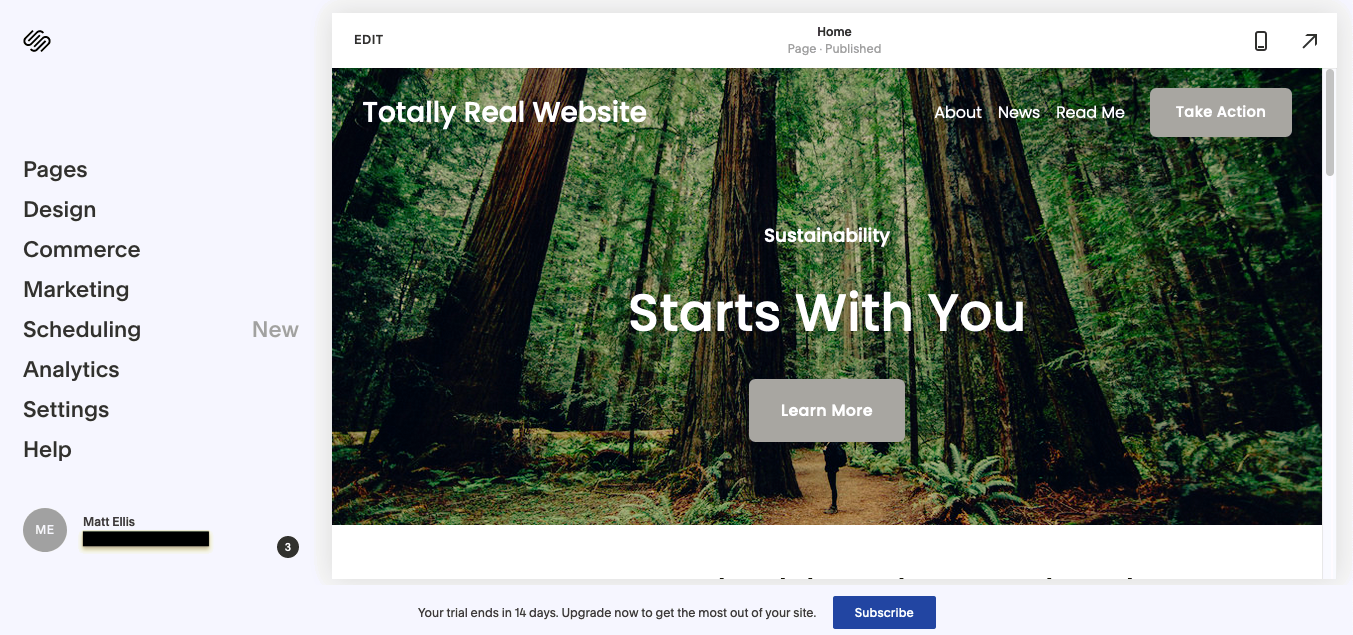
In general, you can navigate the main category you want to edit on the left-hand menu—the individual pages of your website (“Pages”), the design of those pages (“Design”), ecommerce functionality (“Commerce”) and others.
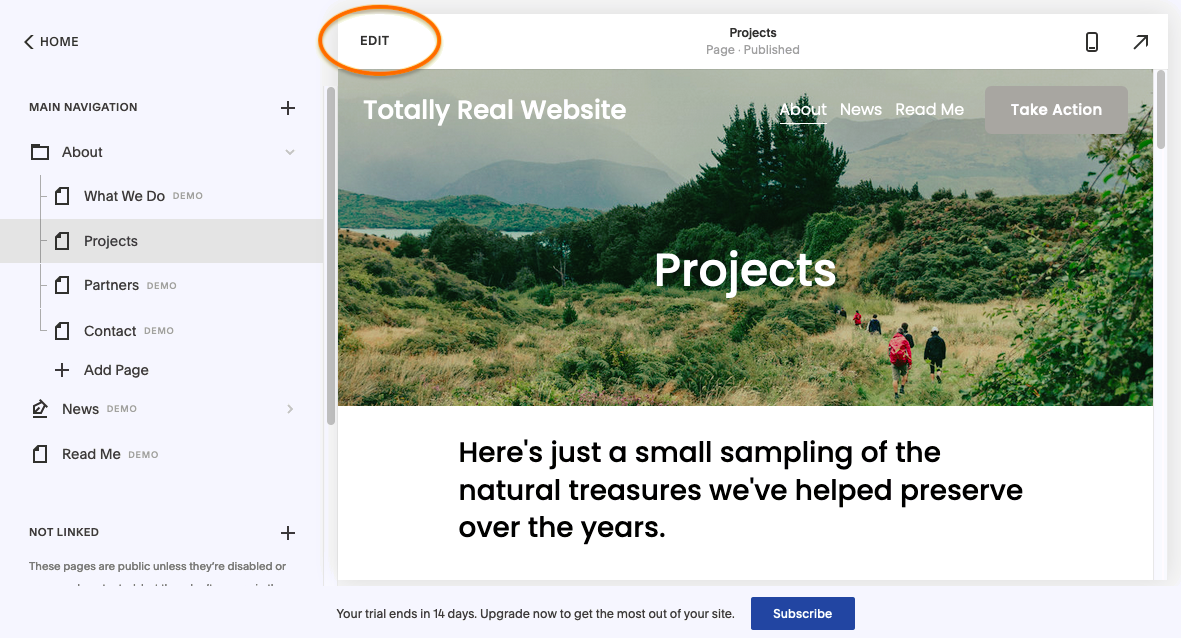
You can open the WYSIWYG editor at any time by clicking Edit in the top-left of the site preview. This is where you can change your text and images, add buttons, and more. You can also switch to a mobile device view by clicking on the smartphone icon in the upper-right corner.
Feel free to experiment yourself. Depending on your project, you may need different design options, but the interface is fairly self-explanatory. Check below for specific step-by-step instructions on more complicated tasks.
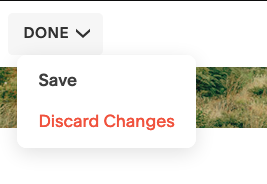
7. After you make changes in the WYSIWYG editor, you have to save (or discard) them before returning to the main editing menu. To do this, click Done in the upper-left corner and click your choice from the dropdown menu.
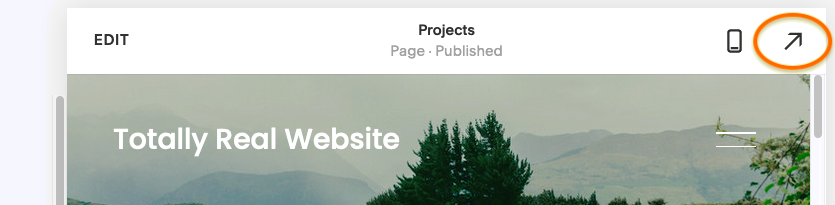
8. To preview your site and interact with it as a user, click on the arrow in the upper-right corner. You can browse your site here, but not edit it. To return, just click the reverse arrow in the upper-right.
9. If you’re serious about creating a Squarespace website and want to publish your page, at some point you’ll need to subscribe to their paid service. When you’re ready, click Subscribe at the bottom of the site editor.
There are four Squarespace pricing plans: two for regular businesses and two for ecommerce. To see a comparison of all the features and payments options, check out the Squarespace pricing page.
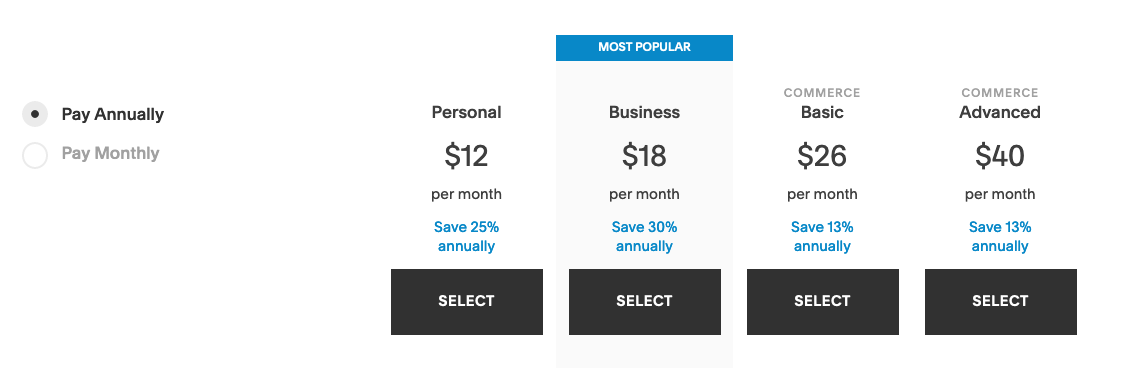
From there, it’s just the standard credit card processing. Once you’ve paid, you can publish your site as soon as you want.
How to edit a page in your Squarespace website
—
Most of the Squarespace website editor is clear enough to understand, but a few common tasks in particular can trip up some users. Below we explain how to add a button, edit text and customize images in Squarespace.
How to add a button
1. Enter the WYSIWYG editor, as explained above.
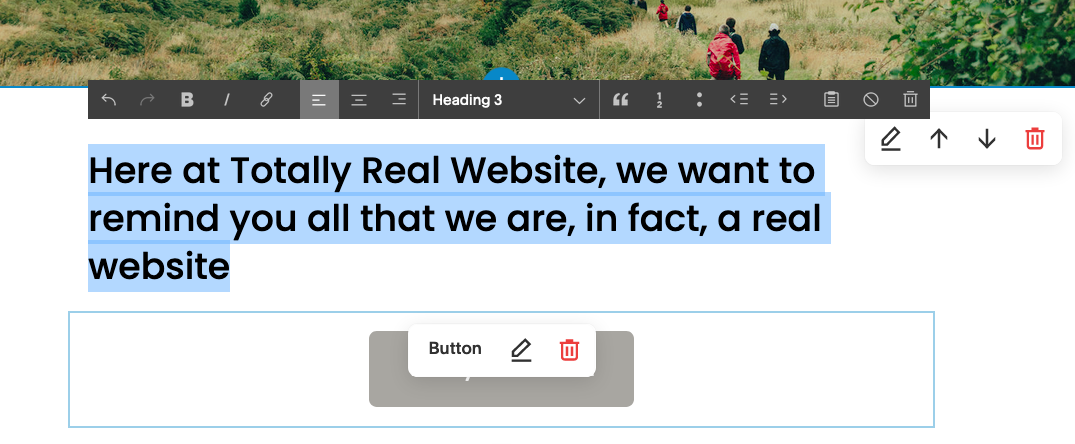
2. Squarespace website templates are naturally broken up into sections. You can see section breaks represented by gray and black circular tabs, but they only appear when you hover near them. If you want to add a new button, you need to do it in these areas. Otherwise, you can edit a template’s pre-existing button to perform the action you want.
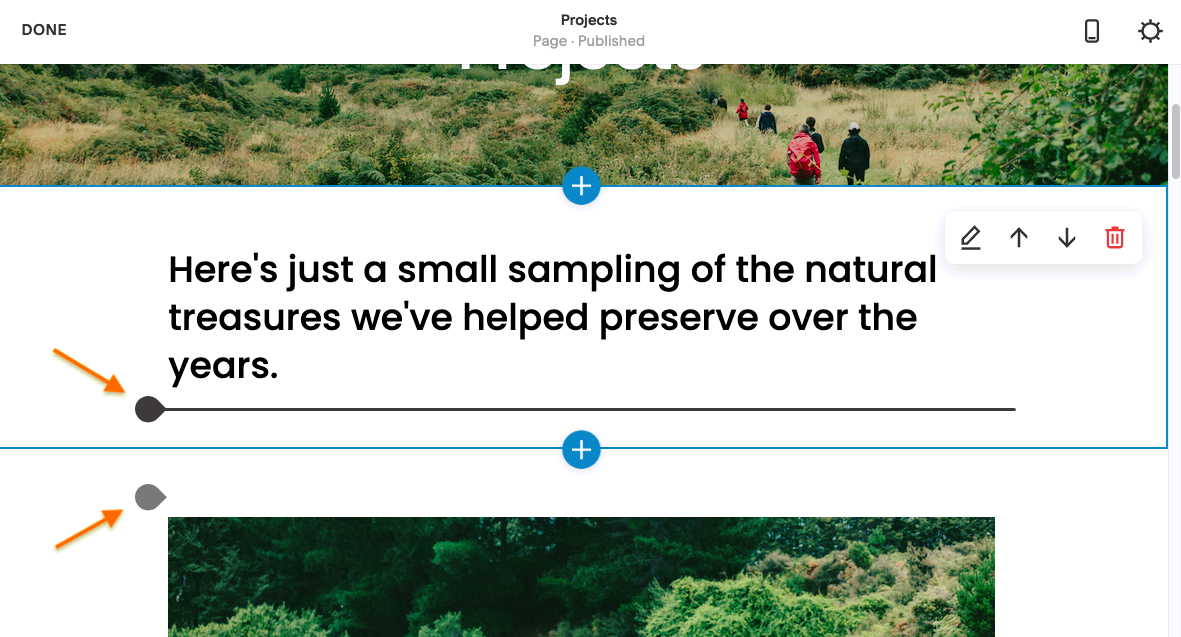
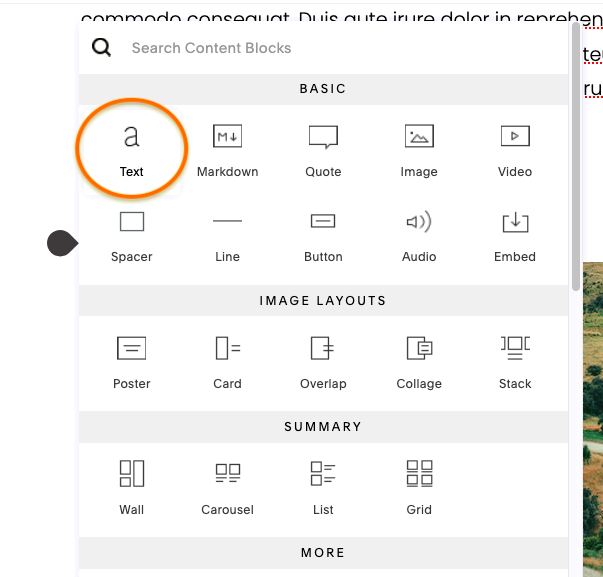
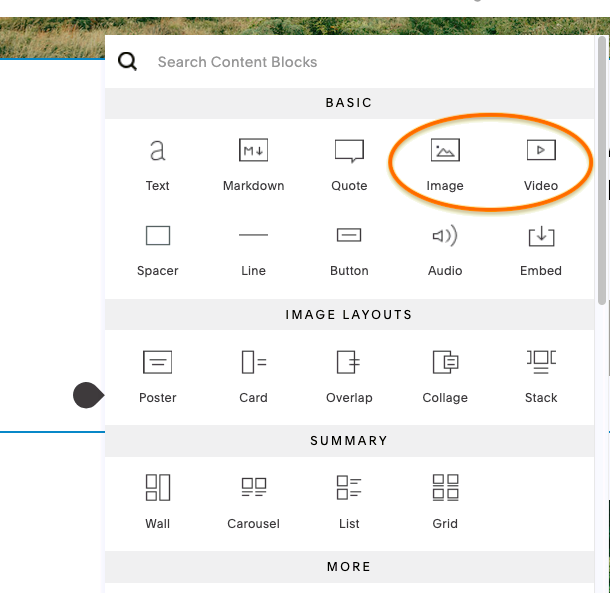
3. Clicking on the tabs mentioned above opens the Content Blocks menu. This is where you can add custom content like text blocks, images, videos, empty space or, in this case, buttons.
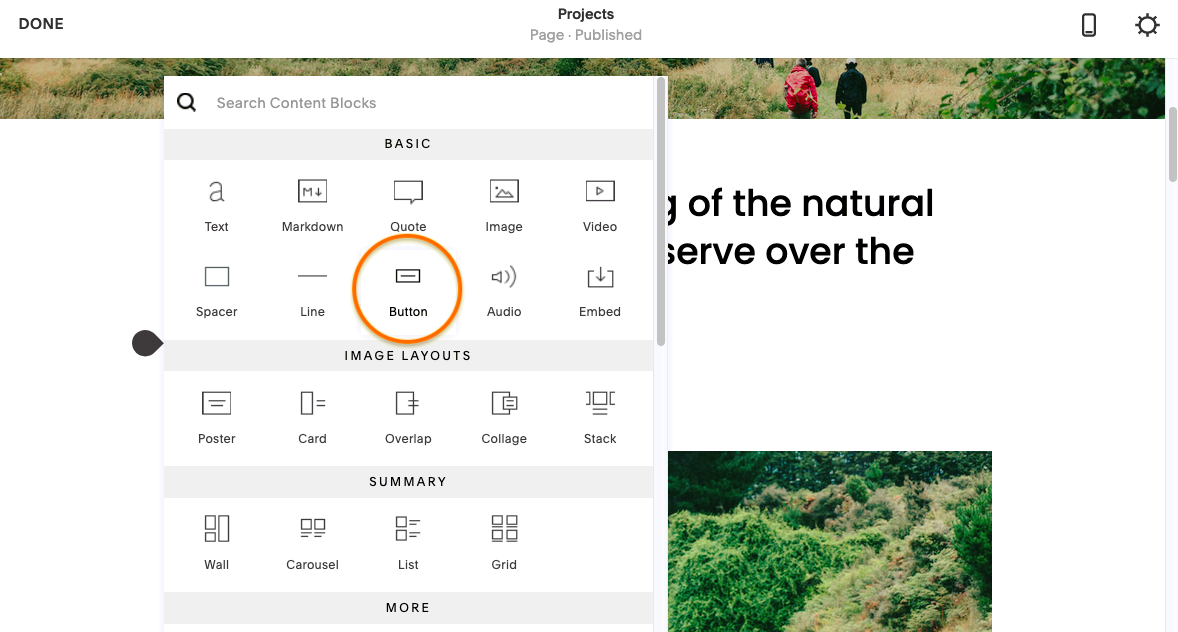
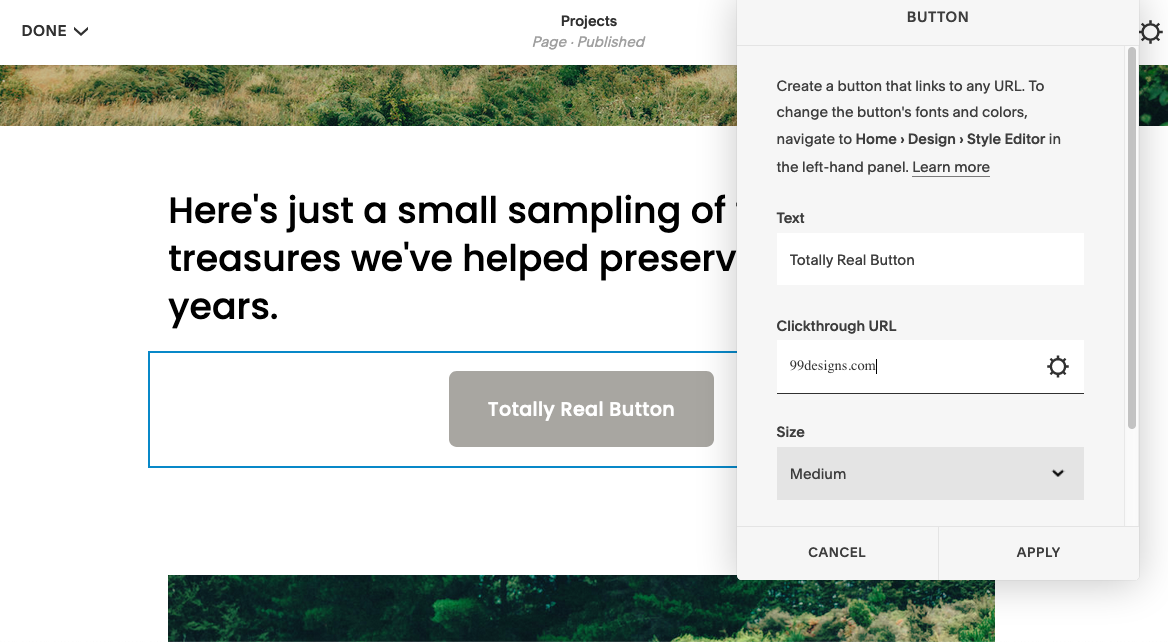
4. Click on Button in the Content Blocks menu to add a new button. You can customize the anchor text, size, alignment and destination URL in the pop-up menu here. Everything else has to be changed elsewhere.
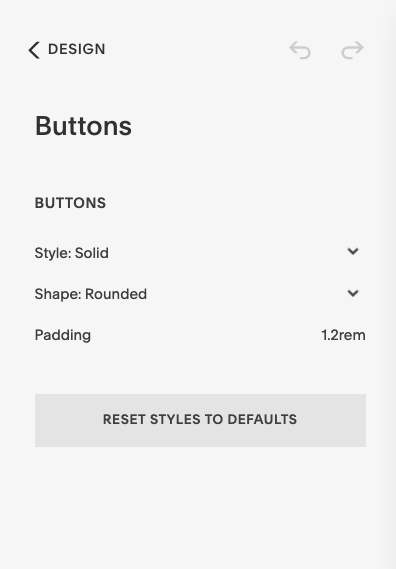
5. To change the button font and color, go to the main editing menu (just save your changes if you’re in the WYSIWYG editor). From the main menu, click Designs > Buttons to change the button defaults. Your changes affect all buttons.
6. The color of your buttons depends on your overall color palette. You can also change this from the main editing menu: go to Design > Colors. Just understand that this affects the colors of more than buttons alone.
How to edit text
1. There are two ways to add and edit text in your Squarespace website. The first involves changing the text that’s already placed, compliments of your chosen template.
To change the pre-existing template text, just enter the WYSIWYG editor and click on the block of text you want to edit. You’ll see a text editor appear at the top, with options for text style, alignment, bullet lists, headings and textual links. (We explain how to change fonts below.)
2. If you want to add text where the template doesn’t already have it, you can do so in the Content Block menu. As we explained above, click on the circular gray/black tab in between sections to open the menu, and then click Text. This will add a new text section, where you can edit text with a text editor as above.
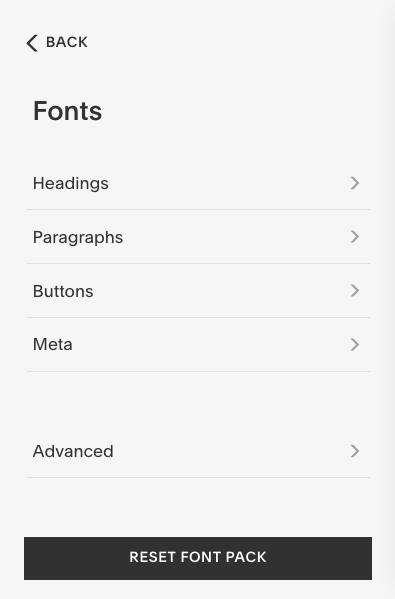
3. No matter how you enter text into your website, you have to go to the main editing menu to edit design choices like font and text size. From the main editing menu, click Design > Fonts to customize your typography.
You can first choose your font, with samples for headers and body text, and a customizable size slider. However, you can more fully personalize the typography of your Squarespace website by clicking on the gear (or “sun”) icon in the upper-right corner of your chosen font.
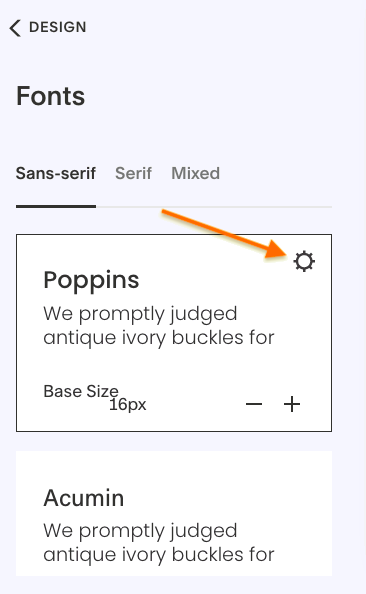
This opens the more advanced font selection menu. Here, you can customize which fonts and sizes you use for different areas, i.e., buttons, headers, price lists, etc.
How to add, edit and resize images and videos
1. To edit images and videos, you first need to enter the WYSIWYG editor.
2. To edit or replace a background image or video double click on that image in the template. Be careful not to click too close to text or buttons or you will open the editor for them instead of the image. Here you can edit, delete or replace the image, or opt for a matte color in lieu of a photo.


Here you can also select Full Bleed (photo extends to the page border) or Inset (there’s a border between the photo and the page border), and choose your opacity if you want to play with photo transparency.
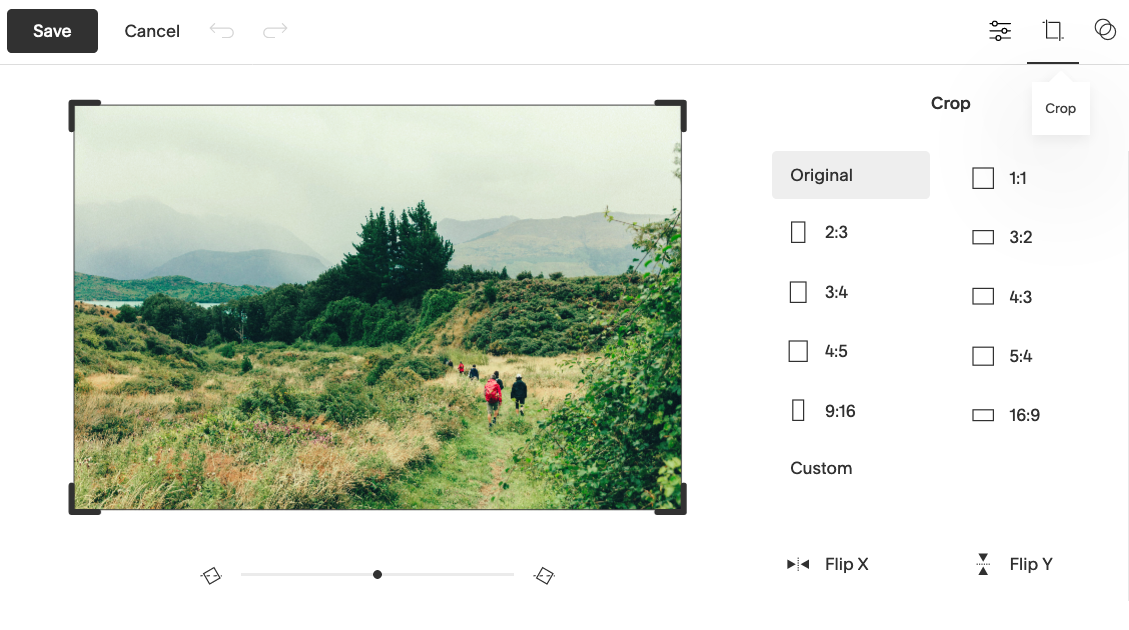
2. For more advanced options, click on Edit Image in the Background tab. This opens the image editor, with more advanced options including resizing photos, cropping and color correction.
3. If you want to add a new image or video where the template doesn’t already have one, again you can use the Content Blocks menu. Click the circular gray/black tab and then choose Image or Video.
How to make a Squarespace website for ecommerce
—

In recent years, Squarespace has been ramping up its ecommerce functionality to compete with online shop builders like Shopify. This gives online retailers more design customization options that more paint-by-number ecommerce platforms don’t.
In case you don’t know how to make a Squarespace website for ecommerce, here’s a quick tutorial. Just know ahead of time that you’ll need one of the two commerce subscription plans to complete and launch an online store.
(NOTE: The beauty of Squarespace is that you can add ecommerce functionality to any template, giving you customization options beyond other online website builders. However, if you’re new to web design, it might be best to use a template specially designed for online stores.)
1. Click on Commerce in the main editing menu.
2. If it’s your first time, this opens a short onboarding assistant to help you get started. You must answer questions about your industry and product range, or you can opt-out at any time by clicking Skip.
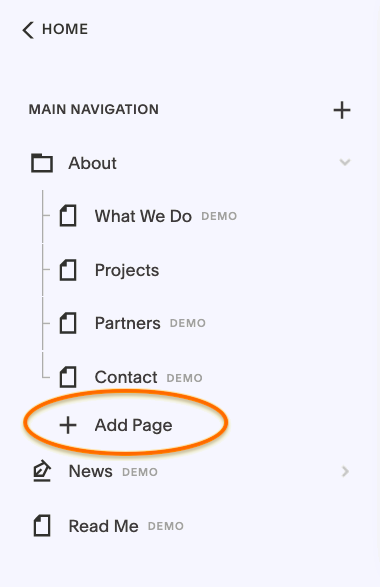
3. First, you need to set up your store pages. In the main editing menu, click Pages, then + Add Page, and then Store. Choose between two different layouts for your products to proceed.
4. There are now some sample products in your Squarespace website editor. Click on the products (in the preview or the WYSIWYG editor) to open the main product editors. You’ll see options for Edit Product and Edit Design in the upper-left corner.
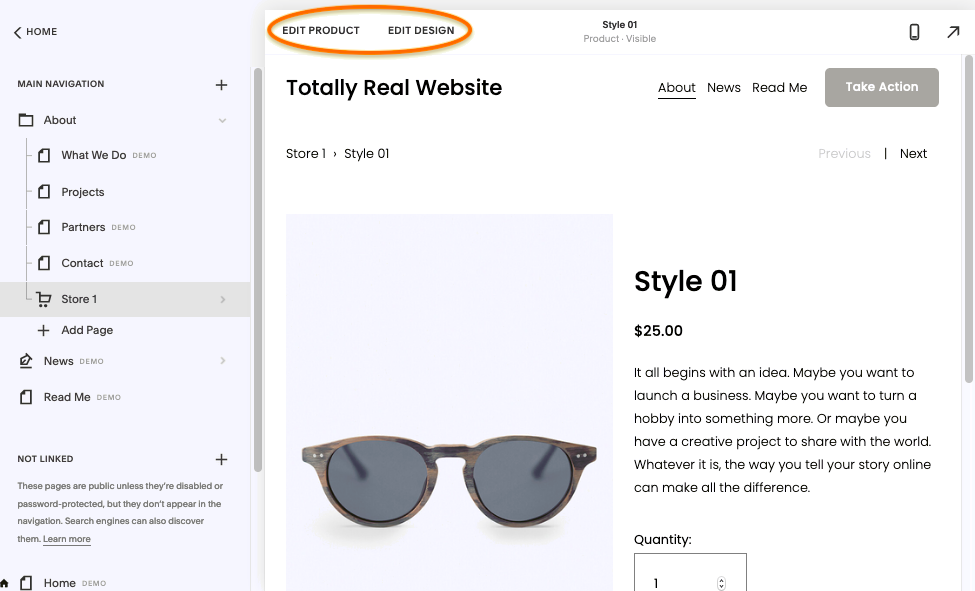
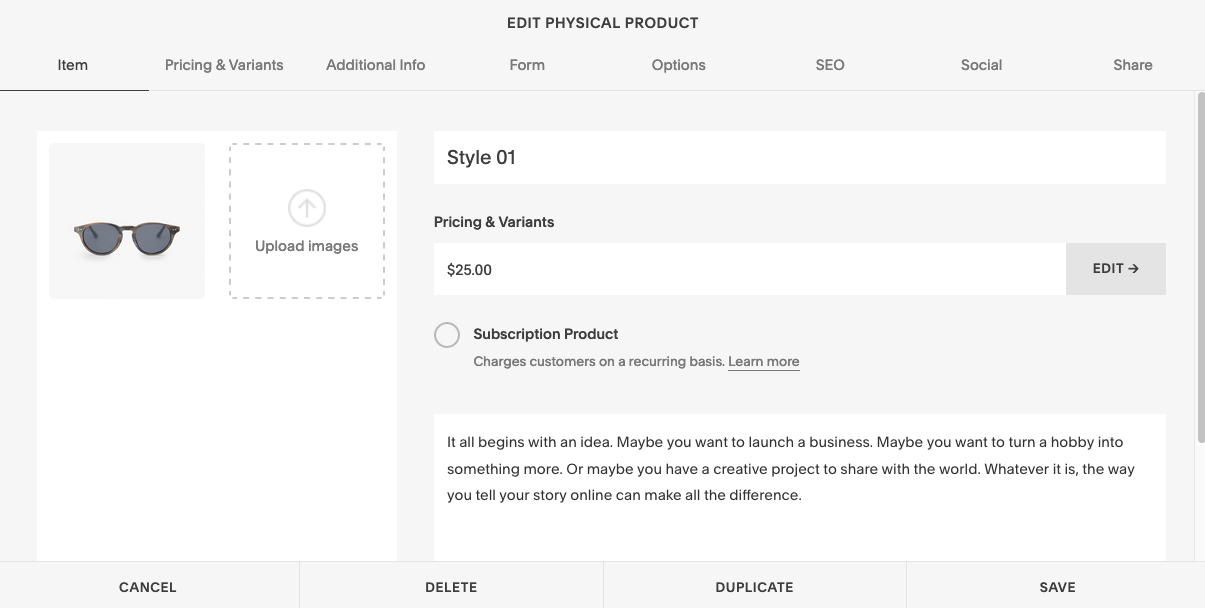
5. Click Edit Product to open the advanced product editor. Here, you can edit all the product specifics: name, price, photos, description text, variants and all the essentials, plus some extras like the option for a recurring subscription service or SEO meta data. You can also edit the social media preview in the Social tab, as well as duplicate or delete the products in the bottom menu.
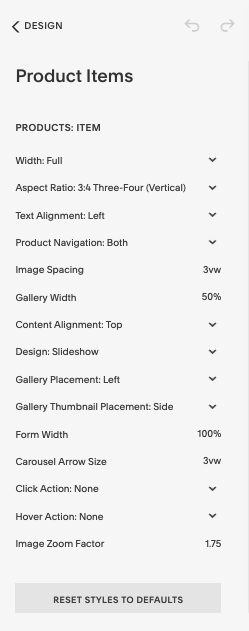
6. Click Edit Design (or, from the main editing menu, click Design > Product Items) to open the product design editor. This is where you can customize all the design elements unrelated to the actual product, such as the image spacing, alignment and general placement, as well as click actions or slideshow features. These design attributes affect all product pages.
7. You need to choose your payment options before your site can go live. In Commerce > Payments, you can choose from three options for your Squarespace website: Stripe, PayPal or Point of Sale (using Point of Sale has its own requirements, including a Square Reader).
Here, you can also change the store currency.
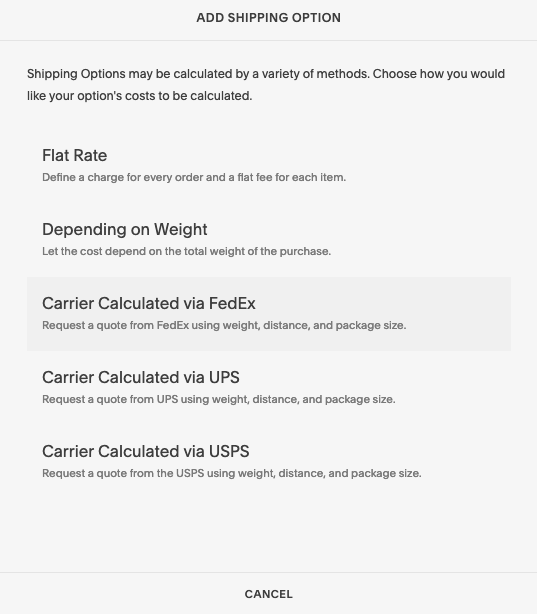
8. You also need to specify your shipping method in Commerce > Shipping. This is where you select your shipping method, as well as edit the specific formulas for how much to charge per location, percentage of markup and the shipping provider. Different shipping methods have different parameter options.
9. That’s all you need to launch your store, but there’s plenty of other useful perks in the Commerce tab.
- In Commerce > Checkout, you can fine-tune your checkout options and enable perks like abandoned cart emails, minimum order amounts or Express Checkout.
- In Commerce > Inventory, you can see a quick-list of all your product pages, for fast editing and updating.
- In Commerce > Customers, you can see customer data, including orders and total spent.
- In Commerce > Discounts, you can set promotional campaigns like coupon codes or flat-discount sales.
Each business model has its own needs, and there’s plenty of customization options available. If you’re looking for something in particular that we haven’t mentioned, explore the main editing menu to see for yourself.
Should you use a template or get a custom Squarespace web design?
—

Squarespace websites are so popular because anyone can design one, regardless of web design experience. That said, if you make it yourself with little or no design experience, it’s going to look like a site made with little or no design experience. And keep in mind that the downside of using a template for is that thousands of other people are using the same template for their website. You’ll have customization options, but there’s a limit to what you can do with a template.
That can work just fine for small and novelty online stores or businesses that are just getting started, but if you’re serious about your online business, you may want a site that looks professional and unique. Or you may be looking for a custom look or functionality that a template just can’t offer you.
Squarespace offers a service that matches you with a professional web designer to design your site for you—you can tell them about your brand, needs and vision and explain all your web design ideas, and your expert designer will put them into action in a unique web design created just for you.
The post How to make a Squarespace website: a step-by-step guide appeared first on 99designs.
No comments:
Post a Comment